MVVM Architecture - Android Tutorial
- Authors
- Name
- Amit Shekhar
- Published on


I am Amit Shekhar, I have taught and mentored many developers, and their efforts landed them high-paying tech jobs, helped many tech companies in solving their unique problems, and created many open-source libraries being used by top companies. I am passionate about sharing knowledge through open-source, blogs, and videos.
Join my program and get high paying tech job: amitshekhar.me
Before we start, I would like to mention that, I have released a video playlist to help you crack the Android Interview: Check out Android Interview Questions and Answers.
In this tutorial, first, we are going to learn about the MVVM architecture in Android, and then we will build a project with MVVM architecture. This tutorial is for anyone who want to get started with the MVVM architecture. As this tutorial is for getting started with MVVM Architecture, I have done some simplifications. Let's get started.
We will cover the following in this tutorial:
- What is MVVM architecture?
- Set up a new project with Kotlin and other dependencies required.
- Project Structure.
- Set up the utils package.
- Set up the data layer.
- Set up the di layer.
- Set up UI layer, build and run the project.
- Project Source Code and What Next?
We are going to use the following in the MVVM Architecture Android project:
- MVVM Architecture
- Kotlin
- Dagger
- Retrofit
- Coroutines
- Flow
- StateFlow
What is MVVM architecture?
MVVM architecture is a Model-View-ViewModel architecture that removes the tight coupling between each component. Most importantly, in this architecture, the children don't have the direct reference to the parent, they only have the reference by observables.

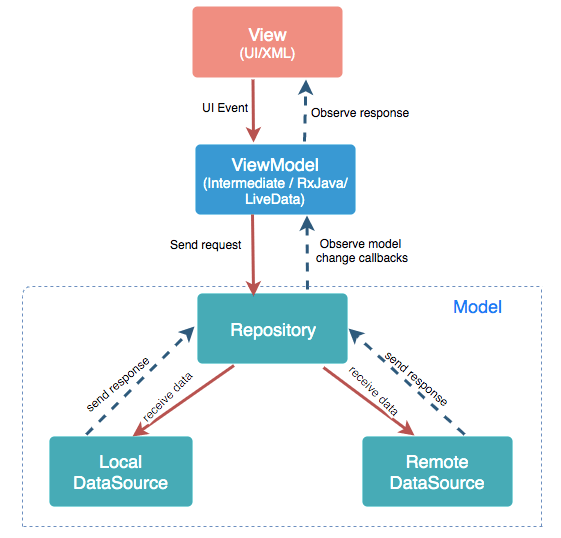
- Model: It represents the data and the business logic of the Android Application. It consists of the business logic - local and remote data source, model classes, repository.
- View: It consists of the UI Code(Activity, Fragment), XML. It sends the user action to the ViewModel but does not get the response back directly. To get the response, it has to subscribe to the observables which ViewModel exposes to it.
- ViewModel: It is a bridge between the View and Model(business logic). It does not have any clue which View has to use it as it does not have a direct reference to the View. So basically, the ViewModel should not be aware of the view who is interacting with. It interacts with the Model and exposes the observable that can be observed by the View. Learn more about the ViewModel from here: What is a ViewModel and how is it useful?
This is all about the MVVM, now let's move to the implementation part of it.
Set up a new project with Kotlin and other dependencies required
Here, we are going to set up the Android Project.
Create a Project
- Start a new Android Studio Project
- Select Empty Activity and Next
- Name: MVVM-Architecture-Android
- Package name: me.amitshekhar.mvvm
- Language: Kotlin
- Finish
- Your starting project is ready now
Add dependencies
Add the following dependencies in your app level build.gradle.
implementation "androidx.recyclerview:recyclerview:1.2.1"
implementation 'com.github.bumptech.glide:glide:4.11.0'
implementation 'com.squareup.retrofit2:retrofit:2.9.0'
implementation 'com.squareup.retrofit2:converter-gson:2.9.0'
implementation 'android.arch.lifecycle:extensions:1.1.1'
implementation 'androidx.lifecycle:lifecycle-viewmodel-ktx:2.5.1'
implementation 'androidx.lifecycle:lifecycle-runtime-ktx:2.5.1'
implementation "com.google.dagger:dagger:2.42"
kapt "com.google.dagger:dagger-compiler:2.42"
implementation 'androidx.browser:browser:1.4.0'
Add id 'kotlin-kapt' in your app level build.gradle.
plugins {
    ...
    id 'kotlin-kapt'
}
To use the ViewBinding, add the following in your app level build.gradle:
android {
    ...
    buildFeatures {
        viewBinding = true
    }
}
Now our project is ready with dependencies.
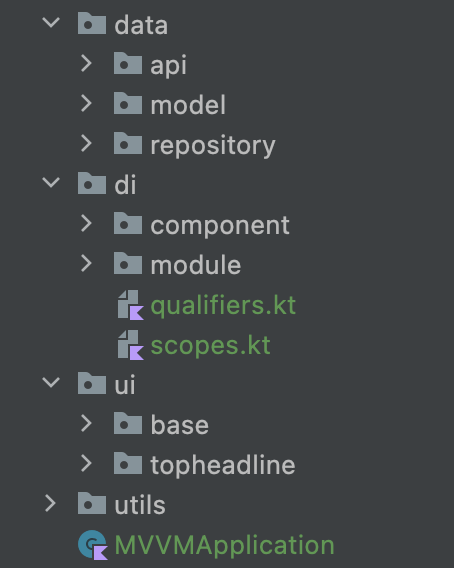
Project Structure
For the Android project, we are going to follow the MVVM architecture. Our package in the project will look like below:

Create the Kotlin class MVVMApplication:
package me.amitshekhar.mvvm

import android.app.Application

class MVVMApplication : Application() {

    override fun onCreate() {
        super.onCreate()
    }

}
And, add the MVVMApplication inside the application tag of the AndroidManifest.xml:
    <application
        android:name="me.amitshekhar.mvvm.MVVMApplication"
        ...>
        ...
    </application>
Now, we can set up our utils package.
Set up the utils package
Create package - utils
We will need a AppConstant object class in Kotlin to store the constants for this MVVM example App.
package me.amitshekhar.mvvm.utils

object AppConstant {

    const val API_KEY = "9f6482a584804376874b848980b7a044"
    const val COUNTRY = "us"

}
Our utils package is ready now.
Set up the data layer
Now, in this section, we will set up the data layer.
Create package - data
Create package - model inside the data
Our API JSON response will be like this.
{
  "status": "ok",
  "totalResults": 2,
  "articles": [
    {
      "source": {
        "id": null,
        "name": "Some name 1"
      },
      "title": "Some title 1",
      "description": "Some description 1",
      "url": "url1",
      "urlToImage": "image1"
    },
    {
      "source": {
        "id": null,
        "name": "Some name 2"
      },
      "title": "Some title 2",
      "description": "Some description 2",
      "url": "url2",
      "urlToImage": "image2"
    }
  ]
}
Accordingly, we need to create our data classes.
Now, create a Kotlin file Source inside the model package.
This will consist of data class Source like below.
package me.amitshekhar.mvvm.data.model

import com.google.gson.annotations.SerializedName

data class Source(
    @SerializedName("id")
    val id: String? = null,
    @SerializedName("name")
    val name: String = "",
)
Then, create a Kotlin file Article inside the model package.
This will consist of data class Article like below.
package me.amitshekhar.mvvm.data.model

import com.google.gson.annotations.SerializedName

data class Article(
    @SerializedName("title")
    val title: String = "",
    @SerializedName("description")
    val description: String = "",
    @SerializedName("url")
    val url: String = "",
    @SerializedName("urlToImage")
    val imageUrl: String = "",
    @SerializedName("source")
    val source: Source
)
After that, create a Kotlin file TopHeadlinesResponse inside the model package.
This will consist of data class TopHeadlinesResponse like below.
package me.amitshekhar.mvvm.data.model

import com.google.gson.annotations.SerializedName

data class TopHeadlinesResponse(
    @SerializedName("status")
    val status: String = "",
    @SerializedName("totalResults")
    val totalResults: Int = 0,
    @SerializedName("articles")
    val articles: List<Article> = ArrayList(),
)
Now, we need to set up our Network Layer.
Create package - api inside the data
Then, create an interface NetworkService inside the api package and add the following code.
package me.amitshekhar.mvvm.data.api

import me.amitshekhar.mvvm.data.model.TopHeadlinesResponse
import me.amitshekhar.mvvm.utils.AppConstant.API_KEY
import retrofit2.http.GET
import retrofit2.http.Headers
import retrofit2.http.Query
import javax.inject.Singleton

@Singleton
interface NetworkService {

    @Headers("X-Api-Key: $API_KEY")
    @GET("top-headlines")
    suspend fun getTopHeadlines(@Query("country") country: String): TopHeadlinesResponse

}
Now, we need repository.
Create package - repository inside the data
Now, create a class TopHeadlineRepository inside the repository package and add the following code.
package me.amitshekhar.mvvm.data.repository

import kotlinx.coroutines.flow.Flow
import kotlinx.coroutines.flow.flow
import kotlinx.coroutines.flow.map
import me.amitshekhar.mvvm.data.api.NetworkService
import me.amitshekhar.mvvm.data.model.Article
import javax.inject.Inject
import javax.inject.Singleton

@Singleton
class TopHeadlineRepository @Inject constructor(private val networkService: NetworkService) {

    fun getTopHeadlines(country: String): Flow<List<Article>> {
        return flow {
            emit(networkService.getTopHeadlines(country))
        }.map {
            it.articles
        }
    }

}
Now, our data layer is ready.
Set up the di layer
Now, in this section, we will set up the Dependency Injection layer.
Create package - di
Inside the di package, create a Kotlin file named as scopes as below:
package me.amitshekhar.mvvm.di

import javax.inject.Scope

@Scope
@Retention(AnnotationRetention.BINARY)
annotation class ActivityScope
Similarly, inside the di package, create a Kotlin file named as qualifiers as below:
package me.amitshekhar.mvvm.di

import javax.inject.Qualifier

@Qualifier
@Retention(AnnotationRetention.BINARY)
annotation class ApplicationContext

@Qualifier
@Retention(AnnotationRetention.BINARY)
annotation class ActivityContext

@Qualifier
@Retention(AnnotationRetention.BINARY)
annotation class BaseUrl
Create package - module inside the di
Now, create a Kotlin class ApplicationModule inside the same module package and add the following code.
package me.amitshekhar.mvvm.di.module

import android.content.Context
import dagger.Module
import dagger.Provides
import me.amitshekhar.mvvm.MVVMApplication
import me.amitshekhar.mvvm.data.api.NetworkService
import me.amitshekhar.mvvm.di.ApplicationContext
import me.amitshekhar.mvvm.di.BaseUrl
import retrofit2.Retrofit
import retrofit2.converter.gson.GsonConverterFactory
import javax.inject.Singleton

@Module
class ApplicationModule(private val application: MVVMApplication) {

    @ApplicationContext
    @Provides
    fun provideContext(): Context {
        return application
    }

    @BaseUrl
    @Provides
    fun provideBaseUrl(): String = "https://newsapi.org/v2/"

    @Provides
    @Singleton
    fun provideGsonConverterFactory(): GsonConverterFactory = GsonConverterFactory.create()

    @Provides
    @Singleton
    fun provideNetworkService(
        @BaseUrl baseUrl: String,
        gsonConverterFactory: GsonConverterFactory
    ): NetworkService {
        return Retrofit.Builder()
            .baseUrl(baseUrl)
            .addConverterFactory(gsonConverterFactory)
            .build()
            .create(NetworkService::class.java)
    }

}
Now, create a Kotlin class ActivityModule inside the same module package and add the following code.
package me.amitshekhar.mvvm.di.module

import android.content.Context
import androidx.appcompat.app.AppCompatActivity
import androidx.lifecycle.ViewModelProvider
import dagger.Module
import dagger.Provides
import me.amitshekhar.mvvm.data.repository.TopHeadlineRepository
import me.amitshekhar.mvvm.di.ActivityContext
import me.amitshekhar.mvvm.ui.base.ViewModelProviderFactory
import me.amitshekhar.mvvm.ui.topheadline.TopHeadlineAdapter
import me.amitshekhar.mvvm.ui.topheadline.TopHeadlineViewModel

@Module
class ActivityModule(private val activity: AppCompatActivity) {

    @ActivityContext
    @Provides
    fun provideContext(): Context {
        return activity
    }

    @Provides
    fun provideTopHeadlineViewModel(topHeadlineRepository: TopHeadlineRepository): TopHeadlineViewModel {
        return ViewModelProvider(activity,
            ViewModelProviderFactory(TopHeadlineViewModel::class) {
                TopHeadlineViewModel(topHeadlineRepository)
            })[TopHeadlineViewModel::class.java]
    }

    @Provides
    fun provideTopHeadlineAdapter() = TopHeadlineAdapter(ArrayList())

}
Note: Both the methods provideTopHeadlineViewModel and provideTopHeadlineAdapter can be completed after finishing the UI layer code.
Create package - component inside the di
Now, create a Kotlin interface ApplicationComponent inside the same component package and add the following code.
package me.amitshekhar.mvvm.di.component

import android.content.Context
import dagger.Component
import me.amitshekhar.mvvm.MVVMApplication
import me.amitshekhar.mvvm.data.api.NetworkService
import me.amitshekhar.mvvm.data.repository.TopHeadlineRepository
import me.amitshekhar.mvvm.di.ApplicationContext
import me.amitshekhar.mvvm.di.module.ApplicationModule
import javax.inject.Singleton

@Singleton
@Component(modules = [ApplicationModule::class])
interface ApplicationComponent {

    fun inject(application: MVVMApplication)

    @ApplicationContext
    fun getContext(): Context

    fun getNetworkService(): NetworkService

    fun getTopHeadlineRepository(): TopHeadlineRepository

}
Now, create a Kotlin interface ActivityComponent inside the same component package and add the following code.
package me.amitshekhar.mvvm.di.component

import dagger.Component
import me.amitshekhar.mvvm.di.ActivityScope
import me.amitshekhar.mvvm.di.module.ActivityModule
import me.amitshekhar.mvvm.ui.topheadline.TopHeadlineActivity

@ActivityScope
@Component(dependencies = [ApplicationComponent::class], modules = [ActivityModule::class])
interface ActivityComponent {

    fun inject(activity: TopHeadlineActivity)

}
Note: The above fun inject(activity: TopHeadlineActivity) line can be added after the addition of the TopHeadlineActivity.
Now, our di layer is ready.
Set up UI layer, build and run the project
Now, in this section, we will setup UI, build the project and run on the device.
Create package - ui
Create package - base inside the ui package
Now, create a Kotlin class ViewModelProviderFactory inside the base package and add the following code.
package me.amitshekhar.mvvm.ui.base

import androidx.lifecycle.ViewModel
import androidx.lifecycle.ViewModelProvider
import javax.inject.Singleton
import kotlin.reflect.KClass

@Singleton
class ViewModelProviderFactory<T : ViewModel>(
    private val kClass: KClass<T>,
    private val creator: () -> T
) : ViewModelProvider.NewInstanceFactory() {

    @Suppress("UNCHECKED_CAST")
    @Throws(IllegalArgumentException::class)
    override fun <T : ViewModel> create(modelClass: Class<T>): T {
        if (modelClass.isAssignableFrom(kClass.java)) return creator() as T
        throw IllegalArgumentException("Unknown class name")
    }

}
We need the sealed interface to represent the UI State. It will communicate the current state of Network Call to the UI Layer. We will create that in the base package.
So, create a sealed interface inside the same base package and add the following code.
package me.amitshekhar.mvvm.ui.base

sealed interface UiState<out T> {

    data class Success<T>(val data: T) : UiState<T>

    data class Error(val message: String) : UiState<Nothing>

    object Loading : UiState<Nothing>

}
Create package - topheadline inside the ui package
Rename the MainActivity to TopHeadlineActivity and move it to the topheadline package
Now, create a Kotlin class TopHeadlineViewModel inside the same topheadline package and add the following code.
package me.amitshekhar.mvvm.ui.topheadline

import androidx.lifecycle.ViewModel
import androidx.lifecycle.viewModelScope
import kotlinx.coroutines.flow.MutableStateFlow
import kotlinx.coroutines.flow.StateFlow
import kotlinx.coroutines.flow.catch
import kotlinx.coroutines.launch
import me.amitshekhar.mvvm.data.model.Article
import me.amitshekhar.mvvm.data.repository.TopHeadlineRepository
import me.amitshekhar.mvvm.ui.base.UiState
import me.amitshekhar.mvvm.utils.AppConstant.COUNTRY

class TopHeadlineViewModel(private val topHeadlineRepository: TopHeadlineRepository) : ViewModel() {

    private val _uiState = MutableStateFlow<UiState<List<Article>>>(UiState.Loading)

    val uiState: StateFlow<UiState<List<Article>>> = _uiState

    init {
        fetchTopHeadlines()
    }

    private fun fetchTopHeadlines() {
        viewModelScope.launch {
            topHeadlineRepository.getTopHeadlines(COUNTRY)
                .catch { e ->
                    _uiState.value = UiState.Error(e.toString())
                }
                .collect {
                    _uiState.value = UiState.Success(it)
                }
        }
    }

}
Here, we have used StateFlow.
Now, let's set up the XML layout.
In the layout folder, rename the activity_main.xml to activity_top_headline.xml and update with the following code:
<?xml version="1.0" encoding="utf-8"?>
<androidx.constraintlayout.widget.ConstraintLayout xmlns:android="http://schemas.android.com/apk/res/android"
    xmlns:app="http://schemas.android.com/apk/res-auto"
    xmlns:tools="http://schemas.android.com/tools"
    android:layout_width="match_parent"
    android:layout_height="match_parent"
    tools:context=".ui.topheadline.TopHeadlineActivity">

    <androidx.recyclerview.widget.RecyclerView
        android:id="@+id/recyclerView"
        android:layout_width="match_parent"
        android:layout_height="match_parent"
        android:visibility="gone" />

    <ProgressBar
        android:id="@+id/progressBar"
        android:layout_width="wrap_content"
        android:layout_height="wrap_content"
        app:layout_constraintBottom_toBottomOf="parent"
        app:layout_constraintEnd_toEndOf="parent"
        app:layout_constraintStart_toStartOf="parent"
        app:layout_constraintTop_toTopOf="parent" />

</androidx.constraintlayout.widget.ConstraintLayout>
Add top_headline_item_layout.xml in the layout folder and add the following code:
<?xml version="1.0" encoding="utf-8"?>
<androidx.constraintlayout.widget.ConstraintLayout xmlns:android="http://schemas.android.com/apk/res/android"
    xmlns:app="http://schemas.android.com/apk/res-auto"
    xmlns:tools="http://schemas.android.com/tools"
    android:layout_width="match_parent"
    android:layout_height="wrap_content"
    android:background="?android:attr/selectableItemBackground"
    android:minHeight="250dp">

    <androidx.appcompat.widget.AppCompatImageView
        android:id="@+id/imageViewBanner"
        android:layout_width="0dp"
        android:layout_height="0dp"
        android:scaleType="centerCrop"
        app:layout_constraintDimensionRatio="16:9"
        app:layout_constraintEnd_toEndOf="parent"
        app:layout_constraintStart_toStartOf="parent"
        app:layout_constraintTop_toTopOf="parent"
        tools:ignore="ContentDescription" />

    <androidx.appcompat.widget.AppCompatTextView
        android:id="@+id/textViewTitle"
        android:layout_width="0dp"
        android:layout_height="wrap_content"
        android:layout_margin="8dp"
        android:ellipsize="end"
        android:maxLines="2"
        android:textColor="@android:color/black"
        android:textSize="16sp"
        app:layout_constraintEnd_toEndOf="parent"
        app:layout_constraintStart_toStartOf="parent"
        app:layout_constraintTop_toBottomOf="@+id/imageViewBanner"
        tools:text="Title" />

    <androidx.appcompat.widget.AppCompatTextView
        android:id="@+id/textViewDescription"
        android:layout_width="0dp"
        android:layout_height="wrap_content"
        android:layout_margin="8dp"
        android:ellipsize="end"
        android:maxLines="2"
        android:textColor="@android:color/darker_gray"
        android:textSize="12sp"
        app:layout_constraintEnd_toEndOf="parent"
        app:layout_constraintStart_toStartOf="parent"
        app:layout_constraintTop_toBottomOf="@+id/textViewTitle"
        tools:text="Description" />

    <androidx.appcompat.widget.AppCompatTextView
        android:id="@+id/textViewSource"
        android:layout_width="0dp"
        android:layout_height="wrap_content"
        android:layout_margin="8dp"
        android:maxLines="1"
        android:textColor="@android:color/darker_gray"
        android:textSize="12sp"
        app:layout_constraintBottom_toBottomOf="parent"
        app:layout_constraintStart_toStartOf="parent"
        app:layout_constraintTop_toBottomOf="@+id/textViewDescription"
        tools:text="Source" />

</androidx.constraintlayout.widget.ConstraintLayout>
Now, create a Kotlin class TopHeadlineAdapter inside the same topheadline package and add the following code.
package me.amitshekhar.mvvm.ui.topheadline

import android.net.Uri
import android.view.LayoutInflater
import android.view.ViewGroup
import androidx.browser.customtabs.CustomTabsIntent
import androidx.recyclerview.widget.RecyclerView
import com.bumptech.glide.Glide
import me.amitshekhar.mvvm.data.model.Article
import me.amitshekhar.mvvm.databinding.TopHeadlineItemLayoutBinding

class TopHeadlineAdapter(
    private val articleList: ArrayList<Article>
) : RecyclerView.Adapter<TopHeadlineAdapter.DataViewHolder>() {

    class DataViewHolder(private val binding: TopHeadlineItemLayoutBinding) :
        RecyclerView.ViewHolder(binding.root) {
        fun bind(article: Article) {
            binding.textViewTitle.text = article.title
            binding.textViewDescription.text = article.description
            binding.textViewSource.text = article.source.name
            Glide.with(binding.imageViewBanner.context)
                .load(article.imageUrl)
                .into(binding.imageViewBanner)
            itemView.setOnClickListener {
                val builder = CustomTabsIntent.Builder()
                val customTabsIntent = builder.build()
                customTabsIntent.launchUrl(it.context, Uri.parse(article.url))
            }
        }
    }

    override fun onCreateViewHolder(parent: ViewGroup, viewType: Int) =
        DataViewHolder(
            TopHeadlineItemLayoutBinding.inflate(
                LayoutInflater.from(parent.context),
                parent,
                false
            )
        )

    override fun getItemCount(): Int = articleList.size

    override fun onBindViewHolder(holder: DataViewHolder, position: Int) =
        holder.bind(articleList[position])

    fun addData(list: List<Article>) {
        articleList.addAll(list)
    }

}
Then, complete the code of the MVVMApplication class:
package me.amitshekhar.mvvm

import android.app.Application
import me.amitshekhar.mvvm.di.component.ApplicationComponent
import me.amitshekhar.mvvm.di.component.DaggerApplicationComponent
import me.amitshekhar.mvvm.di.module.ApplicationModule

class MVVMApplication : Application() {

    lateinit var applicationComponent: ApplicationComponent

    override fun onCreate() {
        super.onCreate()
        injectDependencies()
    }

    private fun injectDependencies() {
        applicationComponent = DaggerApplicationComponent
            .builder()
            .applicationModule(ApplicationModule(this))
            .build()
        applicationComponent.inject(this)
    }

}
Now, we need to complete our TopHeadlineActivity class.
package me.amitshekhar.mvvm.ui.topheadline

import android.os.Bundle
import android.view.View
import android.widget.Toast
import androidx.appcompat.app.AppCompatActivity
import androidx.lifecycle.Lifecycle
import androidx.lifecycle.lifecycleScope
import androidx.lifecycle.repeatOnLifecycle
import androidx.recyclerview.widget.DividerItemDecoration
import androidx.recyclerview.widget.LinearLayoutManager
import kotlinx.coroutines.launch
import me.amitshekhar.mvvm.MVVMApplication
import me.amitshekhar.mvvm.data.model.Article
import me.amitshekhar.mvvm.databinding.ActivityTopHeadlineBinding
import me.amitshekhar.mvvm.di.component.DaggerActivityComponent
import me.amitshekhar.mvvm.di.module.ActivityModule
import me.amitshekhar.mvvm.ui.base.UiState
import javax.inject.Inject

class TopHeadlineActivity : AppCompatActivity() {

    @Inject
    lateinit var topHeadlineViewModel: TopHeadlineViewModel

    @Inject
    lateinit var adapter: TopHeadlineAdapter

    private lateinit var binding: ActivityTopHeadlineBinding

    override fun onCreate(savedInstanceState: Bundle?) {
        injectDependencies()
        super.onCreate(savedInstanceState)
        binding = ActivityTopHeadlineBinding.inflate(layoutInflater)
        setContentView(binding.root)
        setupUI()
        setupObserver()
    }

    private fun setupUI() {
        val recyclerView = binding.recyclerView
        recyclerView.layoutManager = LinearLayoutManager(this)
        recyclerView.addItemDecoration(
            DividerItemDecoration(
                recyclerView.context,
                (recyclerView.layoutManager as LinearLayoutManager).orientation
            )
        )
        recyclerView.adapter = adapter
    }

    private fun setupObserver() {
        lifecycleScope.launch {
            repeatOnLifecycle(Lifecycle.State.STARTED) {
                topHeadlineViewModel.uiState.collect {
                    when (it) {
                        is UiState.Success -> {
                            binding.progressBar.visibility = View.GONE
                            renderList(it.data)
                            binding.recyclerView.visibility = View.VISIBLE
                        }
                        is UiState.Loading -> {
                            binding.progressBar.visibility = View.VISIBLE
                            binding.recyclerView.visibility = View.GONE
                        }
                        is UiState.Error -> {
                            //Handle Error
                            binding.progressBar.visibility = View.GONE
                            Toast.makeText(this@TopHeadlineActivity, it.message, Toast.LENGTH_LONG)
                                .show()
                        }
                    }
                }
            }
        }
    }

    private fun renderList(articleList: List<Article>) {
        adapter.addData(articleList)
        adapter.notifyDataSetChanged()
    }

    private fun injectDependencies() {
        DaggerActivityComponent.builder()
            .applicationComponent((application as MVVMApplication).applicationComponent)
            .activityModule(ActivityModule(this)).build().inject(this)
    }

}
Finally, add the Internet Permission in your project. Add the following in the AndroidManifest.xml:
<uses-permission android:name="android.permission.INTERNET"/>
Now, build the project and run the app on the device. It should load the data into the UI.
Project Source Code and What Next?
You can find the complete project here: MVVM-Architecture-Android.
As we have done some simplifications in this project, so, we can improve this project to go to the Advanced level, a few of the things which we can improve are as follows:
- Create base classes such as BaseActivity.
- Handle all the API errors at a single place in a better way.
- Create Interfaces for the classes wherever required.
- Take advantage of Android KTX - Kotlin Extensions.
- Write Unit-Test Unit Testing ViewModel with Kotlin Flow and StateFlow
- and so on.
Show your love by sharing this blog with your fellow developers.
Prepare yourself for Android Interview: Android Interview Questions
That's it for now.
Thanks
You can connect with me on: