Mastering Kotlin Coroutines
- Authors
- Name
- Amit Shekhar
- Published on


I am Amit Shekhar, I have taught and mentored many developers, and their efforts landed them high-paying tech jobs, helped many tech companies in solving their unique problems, and created many open-source libraries being used by top companies. I am passionate about sharing knowledge through open-source, blogs, and videos.
Join my program and get high paying tech job: amitshekhar.me
Before we start, I would like to mention that, I have released a video playlist to help you crack the Android Interview: Check out Android Interview Questions and Answers.
This article is for anyone who is curious about the Kotlin Coroutines but has no idea what it is exactly. The goal is to make you understand what are Kotlin Coroutines which means that there are few simplifications done while writing this. If you understand what Kotlin Coroutines are, then my mission will be accomplished. If you read this article completely, I am sure my mission will be accomplished.
Knowledge comes to those who crave for it.
In this tutorial, we are going to master the Kotlin Coroutines in Android by covering the following topics:
- What are Coroutines?
- Why there is a need for the solution that Kotlin Coroutines provide?
- Step-by-step guide on how to implement Kotlin Coroutines in Android.
- Launch vs Async in Kotlin Coroutines
- What are the scopes in Kotlin Coroutines?
- Exception handling in Kotlin Coroutines.
- Project to learn Kotlin Coroutines for Android by Examples.
The current framework which is available to handle multithreading leads to callback hells and blocking states because we do not have any other simple way to guarantee thread-safe execution.
A coroutine is a very efficient and complete framework to manage concurrency in a more performant and simple way.
Let's understand what exactly Coroutines are in a very simple way.
What are Coroutines?
Coroutines = Co + Routines
Here, Co means cooperation and Routines means functions.
It means that when functions cooperate with each other, we call it Coroutines.

Let's understand this with an example. I have written the below code in a different way just for the sake of understanding. Suppose we have two functions functionA and functionB.
functionA as below:
fun functionA(case: Int) {
    when (case) {
        1 -> {
            taskA1()
            functionB(1)
        }
        2 -> {
            taskA2()
            functionB(2)
        }
        3 -> {
            taskA3()
            functionB(3)
        }
        4 -> {
            taskA4()
            functionB(4)
        }
    }
}
And functionB as below:
fun functionB(case: Int) {
    when (case) {
        1 -> {
            taskB1()
            functionA(2)
        }
        2 -> {
            taskB2()
            functionA(3)
        }
        3 -> {
            taskB3()
            functionA(4)
        }
        4 -> {
            taskB4()
        }
    }
}
Then, we can call the functionA as below:
functionA(1)
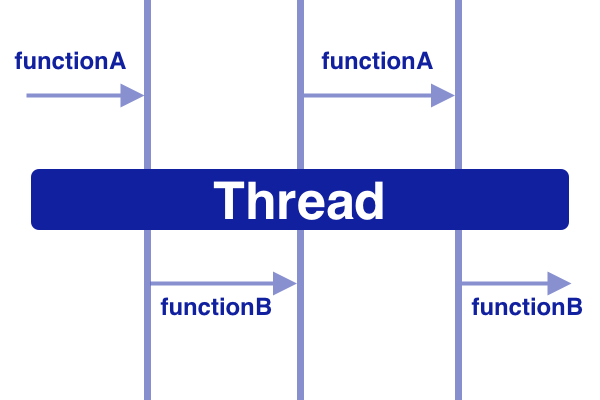
Here, functionA will do taskA1 and give control to functionB to execute taskB1.
Then, functionB will do the taskB1 and give the control back to the functionA to execute the taskA2 and so on.
The important thing is that functionA and functionB are cooperating with each other.
With Kotlin Coroutines, the above cooperation can be done very easily which is without the use of when or switch case which I have used in the above example for the sake of understanding.
Now that, we have understood what are coroutines when it comes to cooperation between the functions. There are endless possibilities that open up because of the cooperative nature of functions.
A few of the possibilities are as follows:
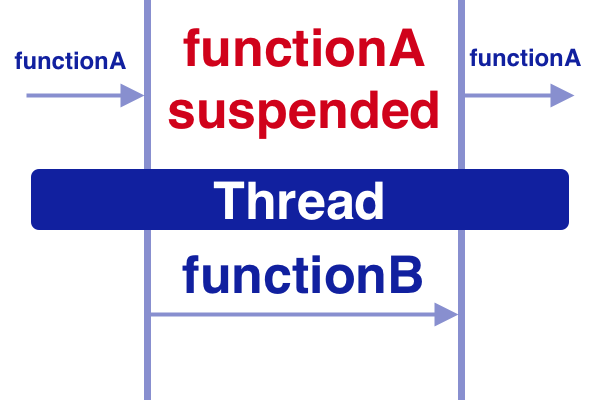
- It can execute a few lines of functionA and then execute a few lines of functionB and then again a few lines of functionA and so on. This will be helpful when a thread is sitting idle and not doing anything, in that case, it can execute a few lines of another function. This way, it can take full advantage of the thread. Ultimately cooperation helps in multitasking.
- It will enable writing asynchronous code in a synchronous way. We will talk about this later in this article.
Overall, the Coroutines make multitasking very easy.
So, we can say that Coroutines and the threads both are multitasking. But the difference is that threads are managed by the OS and coroutines by the users as it can execute a few lines of function by taking advantage of the cooperation.
It's an optimized framework written over the actual threading by taking advantage of the cooperative nature of functions to make it light yet powerful. So, we can say that Coroutines are lightweight threads. A lightweight thread means it doesn't map on the native thread, so it doesn't require context switching on the processor, so they are faster.
What does it mean when I say "it doesn't map on the native thread"?
Coroutines are available in many languages. Basically, there are two types of Coroutines:
- Stackless
- Stackful
Kotlin implements stackless coroutines - it means that the coroutines don't have their own stack, so they don't map on the native thread.
Now, you can understand the below paragraph, what the official website of Kotlin says
One can think of a coroutine as a light-weight thread. Like threads, coroutines can run in parallel, wait for each other and communicate. The biggest difference is that coroutines are very cheap, almost free: we can create thousands of them, and pay very little in terms of performance. True threads, on the other hand, are expensive to start and keep around. A thousand threads can be a serious challenge for a modern machine.
Coroutines do not replace threads, it's more like a framework to manage them.
The exact definition of Coroutines: A framework to manage concurrency in a more performant and simple way with its lightweight thread which is written on top of the actual threading framework to get the most out of it by taking the advantage of cooperative nature of functions.
Now that, we have understood what exactly Coroutines are. Now we need to know why there is a need for the solutions which Kotlin Coroutines provide.
Why there is a need for Kotlin Coroutines?
Let's take the very standard use case of an Android Application which is as follows:
- Fetch the User from the server.
- Show the User in the UI.
fun fetchAndShowUser() {
    val user = fetchUser()
    showUser(user)
}

fun fetchUser(): User {
    // make network call
    // return user
}

fun showUser(user: User) {
    // show user
}
When we call the fetchAndShowUser function, it will throw the NetworkOnMainThreadException as the network call is not allowed on the main thread.
There are many ways to solve that. A few of them are as follows:
- Using Callback: Here, we run the fetchUser in the background thread and we pass the result with the callback.
fun fetchAndShowUser() {
    fetchUser { user ->
        showUser(user)
    }
}

fun fetchUser(callback: (User) -> Unit)) {
    // make network call on background thread to get user
    // callback with user
    callback(user)
}

fun showUser(user: User) {
    // show user
}
Let's see another example in which we have three nested network calls.
fun fetchData() {
    fetchA { a ->
        fetchB(a) { b ->
            fetchC(b) { c ->
                // do something with c
            }
        }
    }
}
This type of nesting is also called - "callback hell".
- Using RxJava: Reactive world approach. This way we can get rid of the nested callback.
fetchUser()
    .subscribeOn(Schedulers.io())
    .observerOn(AndroidSchedulers.mainThread())
    .subscribe { user ->
        showUser(user)
    }

fun fetchUser(): Single<User> {
    // make network call
    // emit user
}

fun showUser(user: User) {
    // show user
}
- Using Coroutines: Yes, coroutines.
fun fetchAndShowUser() {
    GlobalScope.launch(Dispatchers.Main) {
        val user = fetchUser() // fetch on IO thread
        showUser(user) // back on UI thread
    }
}

suspend fun fetchUser(): User {
    return withContext(Dispatchers.IO) {
        // make network call on IO thread
        // return user
    }
}

fun showUser(user: User) {
    // show user
}
Here, the above code looks synchronous, but it is asynchronous. We will see how is it possible.
By writing the launch, we launch a coroutine to do a task.
GlobalScope.launch {
    // do something here
}
Implementation of Kotlin Coroutines in Android
Add the Kotlin Coroutines dependencies in the Android project as below:
dependencies {
  implementation "org.jetbrains.kotlinx:kotlinx-coroutines-core:x.x.x"
  implementation "org.jetbrains.kotlinx:kotlinx-coroutines-android:x.x.x"
}
Let's see all the functions present in the above example:
The fetchAndShowUser function:
fun fetchAndShowUser() {
    GlobalScope.launch(Dispatchers.Main) {
        val user = fetchUser() // fetch on IO thread
        showUser(user) // back on UI thread
    }
}
The fetchUser function:
suspend fun fetchUser(): User {
    return withContext(Dispatchers.IO) {
        // make network call on IO thread
        // return user
    }
}
And the showUser function:
fun showUser(user: User) {
    // show user
}
Note: I have used GlobalScope for quick examples, we should avoid using it at all costs. In an Android project, we should use custom scopes based on our usecase such as lifecycleScope, viewModelScope and etc. We will learn about them below in the scope section.
Don't worry, we will learn the suspend, GlobalScope, withContext, and Dispatchers.IO one by one gradually in this article.
We have introduced two things here as follows:
- Dispatchers: Dispatchers help coroutines in deciding the thread on which the work has to be done. There are majorly three types of Dispatchers which are IO, Default, and Main. IO dispatcher is used for doing the network and disk-related work. Default is used to do the CPU-intensive work. The Main is the UI thread of Android.
If you want to learn more about the Dispatchers: Check Dispatchers in Kotlin Coroutines.
- suspend: Suspend function is a function that could be started, paused, and resume.
Suspend functions are only allowed to be called from a coroutine or another suspend function. You can see that the function fetchUser includes the keyword suspend. So, to use that, we have called it from a coroutine.
Now, how can we call the fetchUser from the onCreate of Activity if needed?
So, the fetchUser can only be called from another suspend function or a coroutine. We can't make the onCreate function of an activity suspend, so we need to call it from the coroutines(by launching a coroutine) as below:
override fun onCreate(savedInstanceState: Bundle?) {
    super.onCreate(savedInstanceState)

    GlobalScope.launch(Dispatchers.Main) {
        val user = fetchUser() // fetch on IO thread
        showUser(user) // back on UI thread
    }

}
fetchUser will run on the IO thread because we have used the Dispatchers.IO with the withContext.
showUser will run on the UI thread because we have used the Dispatchers.Main to launch the coroutine from which it is called.
Let's take another simple example to understand more about it.
class MainActivity : AppCompatActivity() {

    override fun onCreate(savedInstanceState: Bundle?) {
        super.onCreate(savedInstanceState)

        GlobalScope.launch(Dispatchers.Main) {
            doSomething() // non-suspend, UI thread
            doLongRunningTask() // suspend, Default background thread
            doSomethingElse() // non-suspend, UI thread
        }

    }

    fun doSomething() {

    }

    fun doSomethingElse() {

    }

    suspend fun doLongRunningTask() {
        withContext(Dispatchers.Default) {
            // code for doing a long running task
            // Added delay to simulate
            delay(2000)
        }
    }

}
Here, we have 3 functions in which only one function is a suspend function.
- doSomething: non-suspend function
- doLongRunningTask: suspend function
- doSomethingElse: non-suspend function
In this case, the non-suspend functions doSomething and doSomethingElse will run on the UI thread because we have used the Dispatchers.Main to launch the coroutine from which they are called.
And the suspend function doLongRunningTask will run on the Default background thread because we have used the Dispatchers.Default with the withContext.
Here, we launched the coroutine using the Dispatchers.Main, first it starts with the UI Thread, it will execute the function doSomething on the UI thread as that is a non-suspend function. At present, we can say that the control is in the hand of UI Thread.
Then, it will encounter the doLongRunningTask suspend function. It launches a coroutine with the Default background thread as we have used the Dispatchers.Default with the withContext. At present, we can say that the control is in the hand of Default Thread.
After that, when the long task is completed, the control will be given back to the UI Thread because again we have a non-suspend function doSomethingElse. This function will get executed on the UI Thread.
In short, we are launching a new coroutine in the UI context with launch(Dispatchers.Main), first does something on UI Thread, then invoke the suspending function doLongRunningTask to do an asynchronous long task without blocking the main UI thread, and then again does something else on UI Thread.
This is how the code that looks synchronous is asynchronous. It is only possible with the Coroutines in Kotlin. That's the beauty of Kotlin Coroutines.
Now, let's learn about the different ways to start the coroutines.
There are two functions in Kotlin to start the coroutines which are as follows:
launch{}async{}
Launch vs Async in Kotlin Coroutines
The difference is that the launch{} returns a Job and does not carry any resulting value whereas the async{} returns an instance of Deferred<T>, which has an await() function that returns the result of the coroutine like we have future in Java in which we do future.get() to get the result.
In other words:
- launch: fire and forget
- async: perform a task and return a result
Let's take an example to learn launch and async.
We can use the launch as below:
GlobalScope.launch(Dispatchers.Default) {
    // do something and do not return result
}
But when we need the result back, we need to use the async.
val deferred = GlobalScope.async(Dispatchers.Default) {
    // do something and return result, for example 10 as a result
    return@async 10
}
val result = deferred.await() // result = 10
Here, we get the result using the await().
So, now that, we have understood the difference between the launch function and the async function. Learn the difference in detail: Launch vs Async in Kotlin Coroutines
There is something called withContext.
withContext is a suspend function through which we can do a task by providing the Dispatchers on which we want the task to be done.
withContext does not create a new coroutine, it only shifts the context of the existing coroutine and it's a suspend function whereas launch and async create a new coroutine and they are not suspend functions.
Let's see the code for the withContext.
private suspend fun doLongRunningTaskAndDoNotReturnResult() {
    withContext(Dispatchers.Default) {
        // your code for doing a long running task
        // Added delay to simulate
        delay(2000)
    }
}
It can also return a result.
private suspend fun doLongRunningTask(): Int {
    return withContext(Dispatchers.Default) {
        // your code for doing a long running task
        // Added delay to simulate
        delay(2000)
        return@withContext 10
    }
}
As withContext is a suspend function, it can be only called from a suspend function or a coroutine. So, both the above functions are suspend functions.
Let's see an example of using the above function:
GlobalScope.launch(Dispatchers.Main) {
    val result = doLongRunningTask()
    showResult(result) // back on UI thread
}
Now, let's have two long-running tasks with results.
private suspend fun doLongRunningTaskOne(): Int {
    return withContext(Dispatchers.Default) {
        // your code for doing a long running task
        // Added delay to simulate
        delay(2000)
        return@withContext 10
    }
}
private suspend fun doLongRunningTaskTwo(): Int {
    return withContext(Dispatchers.Default) {
        // your code for doing a long running task
        // Added delay to simulate
        delay(2000)
        return@withContext 10
    }
}
Let's see an example of using the above two functions.
GlobalScope.launch(Dispatchers.Main) {
    val resultOne = doLongRunningTaskOne()
    val resultTwo = doLongRunningTaskTwo()
    showResult(resultOne + resultTwo) // back on UI thread
}
Here, after approx 4000 milliseconds, it will show the result as it will complete the first task and then only start the second task.
Now, assume that we have to do both tasks in parallel, so we will have to launch two coroutines. So, we can go with the launch or async to launch the coroutines. Here, as we need the result back from the task, so we will have to go with the async as below:
GlobalScope.launch {

    val deferredOne = async {
        doLongRunningTaskOne()
    }

    val deferredTwo = async {
        doLongRunningTaskTwo()
    }

    val result = deferredOne.await() + deferredTwo.await()

    showResult(result) // back on UI thread

}
Here, we are launching two coroutines using the async, so both tasks will run in parallel. After approx 2000 milliseconds only, it will show the result as it will run both tasks in parallel.
The thumb-rules:
- Both the
launchandasyncare used to launch a coroutine. This enables us to do tasks in parallel. asynccan be used to get the result that is not possible with thelaunch.withContextdoes not launch a coroutine and it is just asuspendfunction used for shifting the context of the existing coroutine.
We will learn about exception handling later in this blog.
Scopes in Kotlin Coroutines
Scopes in Kotlin Coroutines are very useful because we need to cancel the background task as soon as the activity is destroyed. Here, we will learn how to use scopes to handle these types of situations.
In Android-specific projects, we should go with the custom scopes created by considering the LifeCycle of Activity, ViewModel, etc.
The scopes are present under the kotlin extension libraries. Make sure to add the required dependencies to your project.
Activity Scope Example
Assuming that our activity is the scope, the background task should get canceled as soon as the activity is destroyed.
In the activity, we should use lifecycleScope to launch a coroutine.
class MainActivity : AppCompatActivity() {

    override fun onCreate(savedInstanceState: Bundle?) {
        super.onCreate(savedInstanceState)

        lifecycleScope.launch {
            val user = fetchUser()
            // show user
        }

    }

    suspend fun fetchUser(): User {
        return withContext(Dispatchers.IO) {
            // fetch user
            // return user
        }
    }

}
As soon as the activity is destroyed, the task will get canceled if it is running because we have used the scope which is bind to the LifeCycle of the Activity.
ViewModel Scope Example
Assuming that our ViewModel is the scope, the background task should get canceled as soon as the ViewModel is destroyed.
In the ViewModel, we should use viewModelScope to launch a coroutine.
class MainViewModel : ViewModel() {

    fun fetch() {
        viewModelScope.launch {
            val user = fetchUser()
            // show user
        }
    }

    suspend fun fetchUser(): User {
        return withContext(Dispatchers.IO) {
            // fetch user
            // return user
        }
    }

}
As soon as the ViewModel is destroyed, the task will get canceled if it is running because we have used the scope which is bind to the LifeCycle of the ViewModel.
This is how the Scopes in Kotlin Coroutines are very useful.
Exception Handling in Kotlin Coroutines
Exception handling is another important topic. We must learn this.
When Using launch
suspend fetchUserAndSaveInDatabase() {
    withContext(Dispatchers.IO) {
        // fetch user
        // save in database
    }
}
One way is to use a try-catch block:
GlobalScope.launch(Dispatchers.Main) {
    try {
        fetchUserAndSaveInDatabase() // do on IO thread and back to UI Thread
    } catch (exception: Exception) {
        Log.d(TAG, "$exception handled !")
    }
}
Another way is to use a handler:
For this we need to create an exception handler as below:
val handler = CoroutineExceptionHandler { _, exception ->
    Log.d(TAG, "$exception handled !")
}
Then, we can attach the handler as below:
GlobalScope.launch(Dispatchers.Main + handler) {
    fetchUserAndSaveInDatabase() // do on IO thread and back to UI Thread
}
If there is an exception in fetchUserAndSaveInDatabase, it will be handled by the handler which we have attached.
When Using async
When using async, we need to use the try-catch block to handle the exception like below.
val deferredUser = GlobalScope.async {
    fetchUser()
}
try {
    val user = deferredUser.await()
} catch (exception: Exception) {
    Log.d(TAG, "$exception handled !")
}
Now, let's see some more real use cases of exception handling in Android Development.
Suppose, we have two network calls as below:
getUsers()getMoreUsers()
Both are suspend functions.
And, we are making the network calls in series as below:
launch {
    try {
        val users = getUsers()
        val moreUsers = getMoreUsers()
    } catch (exception: Exception) {
        Log.d(TAG, "$exception handled !")
    }
}
If one of the network calls fails, it will directly go to the catch block.
But suppose, we want to return an empty list for the network call which has failed and continue with the response from the other network call. We can add the try-catch block to the individual network call as below:
launch {
    val users = try {
        getUsers()
    } catch (e: Exception) {
        emptyList<User>()
    }
    val moreUsers = try {
        getMoreUsers()
    } catch (e: Exception) {
        emptyList<User>()
    }
}
This way, if any error comes, it will continue with the empty list.
Now, what if we want to make the network calls in parallel? We can write the code like below using async.
launch {
    try {
        val usersDeferred = async {  getUsers() }
        val moreUsersDeferred = async { getMoreUsers() }
        val users = usersDeferred.await()
        val moreUsers = moreUsersDeferred.await()
    } catch (exception: Exception) {
        Log.d(TAG, "$exception handled !")
    }
}
Here, we will face one problem, if any network error comes, the application will crash!, it will NOT go to the catch block.
To solve this, we will have to use the coroutineScope as below:
launch {
    try {
        coroutineScope {
            val usersDeferred = async {  getUsers() }
            val moreUsersDeferred = async { getMoreUsers() }
            val users = usersDeferred.await()
            val moreUsers = moreUsersDeferred.await()
        }
    } catch (exception: Exception) {
        Log.d(TAG, "$exception handled !")
    }
}
Now, if any network error comes, it will go to the catch block.
But suppose again, we want to return an empty list for the network call which has failed and continue with the response from the other network call. We will have to use the supervisorScope and add the try-catch block to the individual network call as below:
launch {
    supervisorScope {
        val usersDeferred = async { getUsers() }
        val moreUsersDeferred = async { getMoreUsers() }
        val users = try {
            usersDeferred.await()
        } catch (e: Exception) {
            emptyList<User>()
        }
        val moreUsers = try {
            moreUsersDeferred.await()
        } catch (e: Exception) {
            emptyList<User>()
        }
    }
}
Again, this way, if any error comes, it will continue with the empty list.
This is how supervisorScope helps.
Conclusion:
- While NOT using
async, we can go ahead with thetry-catchor theCoroutineExceptionHandlerand achieve anything based on our use cases. - While using
async, in addition totry-catch, we have two options:coroutineScopeandsupervisorScope. - With
async, usesupervisorScopewith the individualtry-catchfor each task, when you want to continue with other tasks if one or some of them have failed. - With
async, usecoroutineScopewith the top-leveltry-catch, when you do NOT want to continue with other tasks if any of them have failed.
The major difference is that a coroutineScope will cancel whenever any of its children fail. If we want to continue with the other tasks even when one fails, we go with the supervisorScope. A supervisorScope won't cancel other children when one of them fails.
If you want to learn more about the coroutineScope and supervisorScope: Check coroutineScope vs supervisorScope.
This is how exception handling can be done in the Kotlin Coroutines.
I think we have received a good amount of knowledge today. Thank you so much for your time.
Now, let's start using the Kotlin Coroutines.
Project to learn Kotlin Coroutines for Android by Examples: Learn Kotlin Coroutines
Do share this blog with your fellow developers to spread the knowledge.
Learn Kotlin Flow from here: Kotlin Flow
That's it for now.
Thanks
You can connect with me on: