Building iOS App With VIPER Architecture
- Authors
- Name
- Amit Shekhar
- Published on


I am Amit Shekhar, I have taught and mentored many developers, and their efforts landed them high-paying tech jobs, helped many tech companies in solving their unique problems, and created many open-source libraries being used by top companies. I am passionate about sharing knowledge through open-source, blogs, and videos.
Join my program and get high paying tech job: amitshekhar.me
Before we start, I would like to mention that, I have released a video playlist to help you crack the Android Interview: Check out Android Interview Questions and Answers.
This article is about the iOS VIPER architecture. We will go through the following three points.
- What is VIPER architecture?
- Building an iOS application with VIPER architecture.
- Advantages of VIPER architecture.
Following a standard architecture is important as it decouples the code for reusability and testability. It divides the application components based on its role, called separation of concern.
So, let’s explore the VIPER architecture for iOS.
What is VIPER architecture?
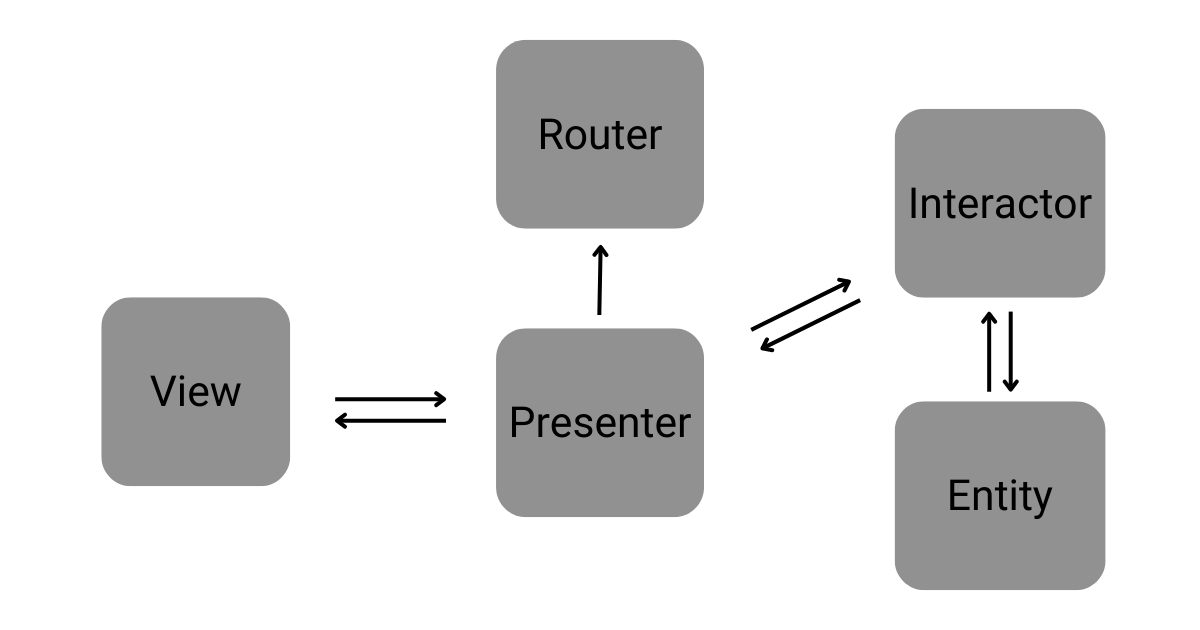
VIPER is a backronym for View, Interactor, Presenter, Entity, and Router.
This architecture is based on Single Responsibility Principle which leads to a clean architecture.
- View: The responsibility of the view is to send the user actions to the presenter and shows whatever the presenter tells it.
- Interactor: This is the backbone of an application as it contains the business logic.
- Presenter: Its responsibility is to get the data from the interactor on user actions and after getting data from the interactor, it sends it to the view to show it. It also asks the router/wireframe for navigation.
- Entity: It contains basic model objects used by the Interactor.
- Router: It has all navigation logic for describing which screens are to be shown when. It is normally written as a wireframe.
Blueprint of VIPER architecture
Viper architecture is used for building large projects, but for the sake of understanding, I have created a very simple app to describe it properly.
Building iOS application with VIPER architecture
I have created a detailed sample app using VIPER architecture for iOS.
Here is the link to the sample app.
Let’s see the project structure properly for better understanding.

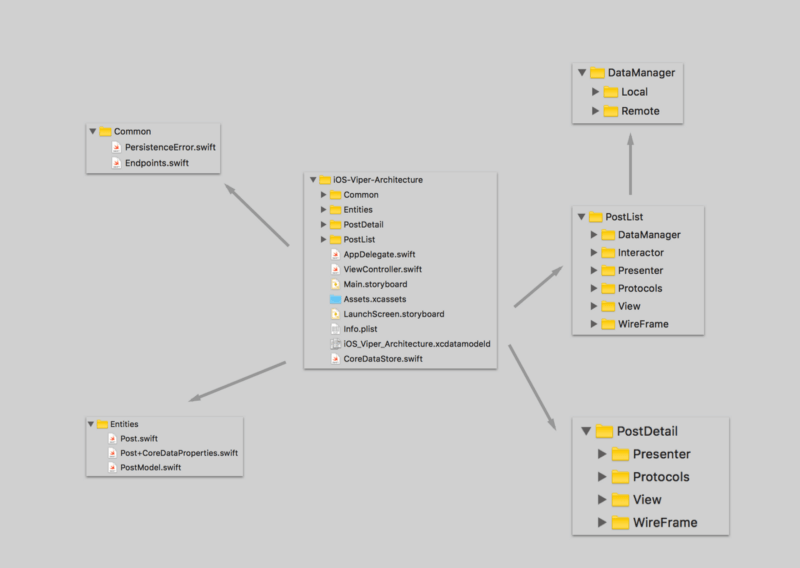
The application consists of the three screens:
- Launch Screen: This is a usual launch screen. So there is nothing to describe here.
- PostListView Screen: This PostListView tells the presenter to get the post list. Then, the presenter contacts the interactor for the relevant data. The interactor checks the availability of data in the local database, if the data is present it returns to the presenter and the presenter to the view. If the data is not present in the local database, it makes the network call to get the data and return it to the presenter and also saves the data in the local database(CoreData).
- PostDetailView Screen: When the user clicks on any of the post presented on the PostListView, the PostListPresenter ask the router (PostListWireFrame) to open the PostDetailView. The detail of the selected post is shown on this screen.
And most of the communications between the different classes happens via protocols defined in the project.
The best way to understand it completely is by checking the code and by implementing it. Just clone the project, build and run.
Advantages of VIPER architecture
- It decouples the code for reusability and testability.
- It divides the application components based on its role, called separation of concern.
- Adding new features is easier.
- It’s easier to write automated tests since your UI logic is separated from the business logic.
That's it for now.
Thanks
You can connect with me on: